Capa de anotaciones
Introducción
This gvSIG tool makes advanced labelling easy.
The process creates a new layer which represents annotations.
The main features of this new layer can be summarised as follows:
- The new layer is only composed of the annotations created.
- The table associated with this new layer only contains the fields which refer to the text of the annotations (Text, Font, Colour, Height and Rotation).
- The layer created is always in .shp format, irrespective of the format of the original layer.
Crear una capa de anotaciones
To create an annotation layer, first select the layer from the ToC (Table of Contents).
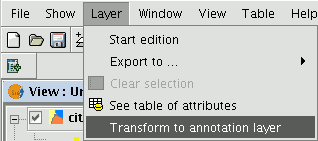
In the menu bar, select the “Layer” option, then select “Export to” and finally select the “Annotation” option.
This option opens the wizard which will guide you through the steps required to create the annotation layer.
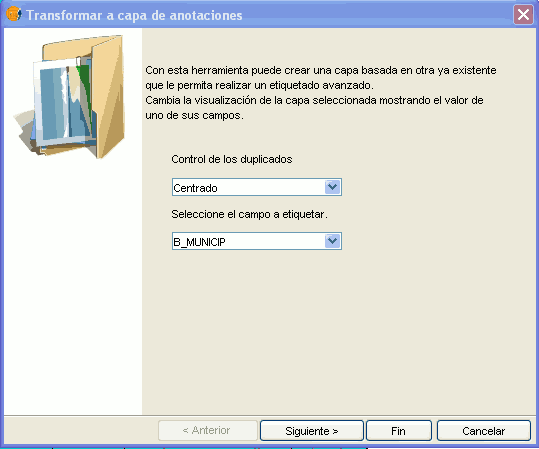
In the wizard’s first window, select the data which gvSIG requires to carry out the operation from the pull-down tab:
Duplicate control: Select either “None” or “Centred” to choose the position in which you wish the annotations to be inserted.
Centred: A label is created for each value and this will be inserted in the centre of all the labels which are the same.
None: A label is inserted for each value, even if these are repeated.
Select the field to be labelled: Choose the field which contains the text you wish the labels to show.
If you do not wish to modify the format of the annotations created by gvSIG and prefer a standard format, click on “Finish”. If you wish to customise the format, click on “Next”.
The wizard’s second window allows you to select the fields of attributes of a a table (if there are any) which contain the values which allow you to customise the labelling.
The following parameters can be customised.
Slope – the slope the annotation will have in the view.
Colour – annotation text colour.
Height – annotation text height.
Units – units in which the value assigned to the “Height” field are to be measured.
The options currently available are map units or pixels.
Font – annotation text font.
Set the values to be used for customising the required parameter (by pulling down the list).
Leave the default value in the fields you do not wish to customise.
Click on “Finish” when you have input these changes.
Edición de una capa de anotaciones
An annotation layer can be edited like any other layer. To start an editing session in gvSIG, select the layer in the Table of Contents and then select the option “Start edition”.
When you start an editing session, an option appears in the menu bar called “Modify annotation”. This will allow you to individually customise the annotation you wish to change.

When you click on this button, the appearance of the cursor will change. You may graphically select the annotation by clicking on the point associated with the text and then access a set of properties shown in the following image.
Propiedades de la capa de anotaciones
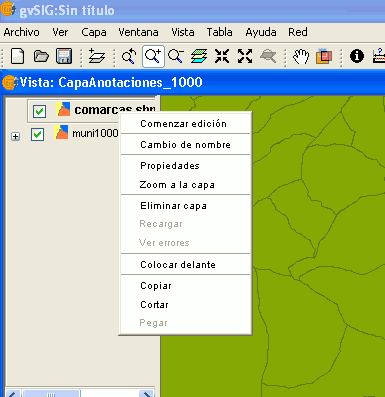
If we select the “Properties” option from the annotation layer contextual menu, the following box appears:
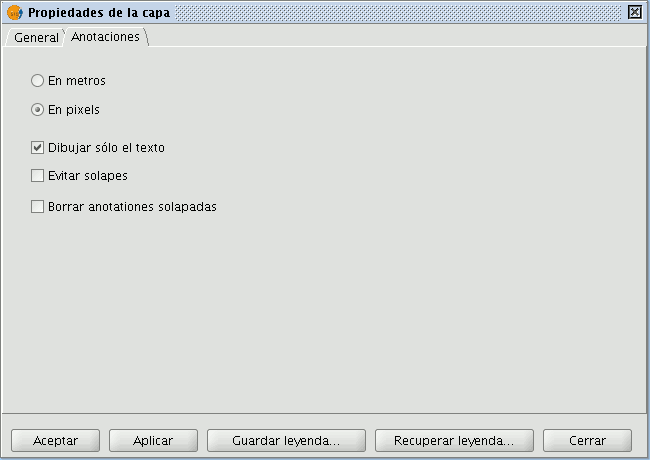
The “Layer properties” box has two tabs. The “General” tab allows you to access the general properties of the layer and the “Annotations” tab allows you to select: whether you wish the annotation text to be shown in pixels or metres in the view.
Whether you want only the text to appear (select the “Draw text only” option) or if you prefer the text to be accompanied by a location point (deselect the “Draw text only” option).
However, remember that this point is useful, for example, to move the annotation or to access the “Modify annotation” window.
If you wish to avoid overlays, activate the “Avoid overlays” option.
If you wish to eliminate overlaying annotations, activate the “Clear overlaying annotations” option.
Añadir la capa de anotaciones a la vista
To add an annotation layer, click on the “Add layer” button in the tool bar

and select the “Annotation” tab.
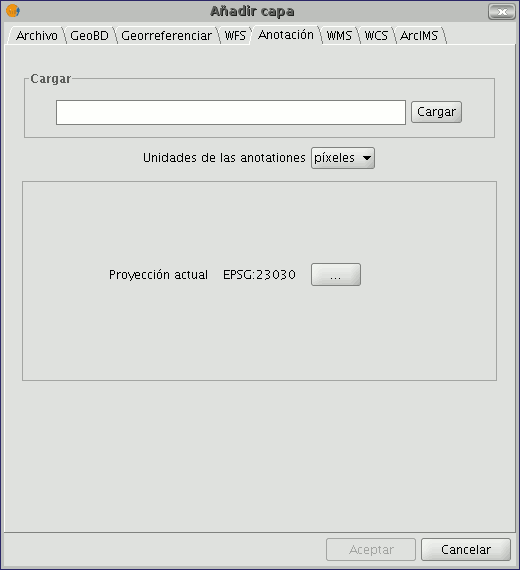
In the box you can select the annotation layer you wish to load, in addition to the units in which the annotations are displayed (pixels or metres) and the projection of the layer.
Ejemplo de creación de capa de anotaciones
The following image shows how an annotation layer is created out of a polygon layer called “muni10000.shp” which contains all the towns in the Valencian Region.
In the first window of the wizard, insert the type of duplicate control you wish to use and select the field which contains the text to be shown.
This is the field in a layer’s table of attributes which contains the name of the town.
If you do not wish to customise the presentation, click on “Finish” and indicate where you wish the new annotation layer to be saved.
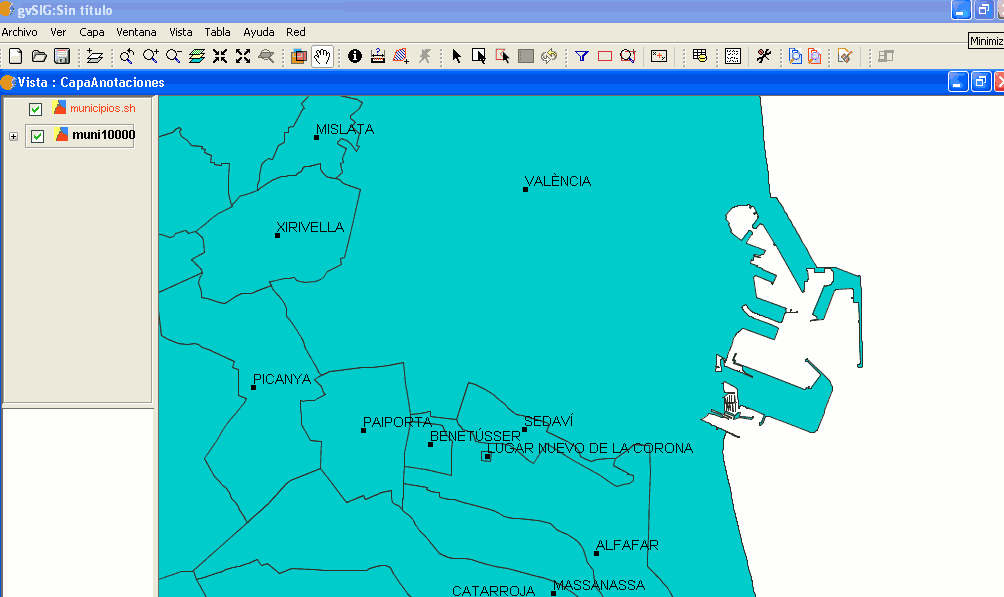
The following image shows the result (the rest of the fields in the wizard are left with their default values and this one is zoomed in) of creating the “annotation layer”.
The annotation layer which has been created is the one in red called “Towns” in the Table of Contents.
